Christmas crafts: A step-by-step guide to making a trinket dish

In partnership with GRB Skin Clinic.
Get glowing for Christmas and beyond with Sale's skincare expert, GRB Skin Clinic!
If you’d like to get booked in before Christmas, book online now.
As part of Christmas in Sale, we've teamed up with local creative craft business Love to Craft MCR to guide you through creating a special handmade gift for someone you love.

This beautiful handmade trinket dish is a special keepsake that the recipient will love. You can find a step-by-step guide below to make this little gift.
What you need to make a trinket dish
An adult hand-sized ball of air-dry clay
A rolling pin
A smooth surface to work on (e.g. a flat porcelain plate)
Letter stamps (optional)
A small bowl that will serve as a cutter for the clay
A bowl and some cling film
Sanding paper (optional)
Acrylic paint and a small paintbrush
Step-by-step craft guide

STEP ONE
Roll out the clay on a smooth surface and keep turning it until it reaches a thickness of about 0.5cm to 1cm and until it is big enough to fit your cutter.

STEP TWO
Use your 'cutter' (like a plastic bowl) to cut your clay.

STEP THREE
Carefully remove any excess clay around it.

STEP FOUR
Use some letter stamps (if you have them) to gently stamp in a name or a word.
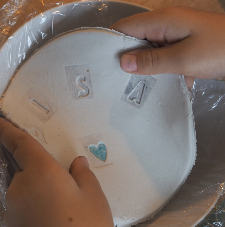
STEP FIVE
Lay the cling film in your bowl and gently lift the round dough shape from the surface using a knife.
Carefully drop the clay into the bowl with cling film and make sure the clay is placed on the cling film (the cling film works as a barrier between the bowl and the clay).

STEP SIX
Dip your fingers in a little water and smoothen the edges.
Let your trinket dry for 2-3 days near a radiator. After about 10 hours you can gently lift the trinket out of the bowl (do it as gently as possible!) Remove the cling film and turn around so that the other side can dry as well. Keep turning it every now and then until dry.

STEP SEVEN
Once dry use the sanding paper to smooth the edges. Alternatively, you can also wet your fingers a little bit and smoothen the edges that way.

STEP EIGHT
Use the acrylic paint and the paint brush to add some colour to your trinket dish.

STEP NINE
Let dry and wrap your gorgeous gift – and most importantly: be proud of what you have made!
Craft and images © Love to Craft MCR.
🎅🏼 Can’t get enough of Christmas crafts? Decorate your own Christmas wrapping paper!

Christmas in Sale: in partnership with GRB Skin Clinic.